Materials needed:
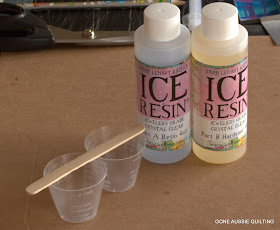
--Ice Resin - Part A (Resin) & Part B (Hardener)
--Mod Podge
--Paint brush
--Measuring cups
--Tongue depressors
--Silver bezel (You can use any sort of bezel that you like.)
--Large stable piece of cardboard
--Small piece of lightweight cardboard
--Scissors
--Syringe
--Sharp pencil
--Needle or pin
--Plastic cover
--Level working surface
Mod Podge can be purchased at most craft type stores. I purchased mine at Spotlight in Australia.
The silver bezels I purchased from this wonderful Etsy seller: Captured Moments. She is very fast with shipping. Of course you can use any sort of bezel you would like, I just liked the handcrafted look of these ones.
For the syringe, I used extras I had on hand saved from the children's Panadol medicine. Make sure you use one that is larger rather than smaller. Using a syringe will help you avoid having to do clean ups and is very helpful.
All right, let's begin!
In order to audition areas of your chosen fabric and to find the best placement to fit into the pendant, it will be helpful to make a viewfinder. Use the small lightweight cardboard piece and use the sharp pencil to trace around the silver bezel. Use the scissors to cut out the drawn shape making sure to cut on the inside of the drawn line.
Select your chosen fabric and using the view finder trial different options until a pleasing effect is found.
Using the pencil lightly trace against the cut area of the viewfinder directly onto the fabric. Cut the fabric just to the inside of the drawn line.
Carefully place the cut fabric piece inside the bezel. Make sure fabric lies flat within the bezel and that it covers the entire base area. Check that there are no loose threads either underneath or at the edges of the fabric.
Coat the fabric with a thin layer of Mod Podge taking care not to let any one area have too much. This is necessary in order to help keep the fabric from lifting up or shifting after the resin is put inside the bezel. Let the layer of Mod Podge dry completely. This may take a few hours.
Prepare the Ice Resin mixture. Use two measuring cups, the tongue depressor for stirring and parts A and B of the Ice Resin solution to mix the Ice Resin.
It is better to mix the ice resin at room temperature or warmer, if working in a cooler room the resin mixtures can be warmed by running warm water over the sealed bottles or in a warm bottle bath. This helps reduce bubbles and helps the mixture to pour smoother. Starting with part A resin solution pour out an exact measurement into the measuring cup. It is very important to measure exact amounts otherwise your Ice Resin mixture will not cure properly.
Measure out the exact same amount of the Part B resin hardener into the second measuring cup.
Again, it is important to have equal amounts of both Part A Resin and Part B Hardener otherwise proper curing will not occur. It is better to have a drop or two more of the hardener rather than the other way around.
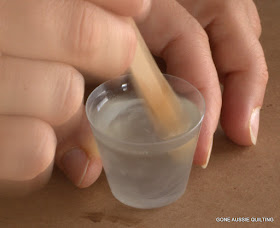
Slowly stir the mixture for two full minutes.
Create an elevated area using the tongue depressors by placing them in parallel lines. Place the silver bezel on top of the tongue depressors in order to allow the bezel to sit up high free from tilting on the cardboard surface.
Prepare enough bezels for pouring the entire Ice Resin mixture. The mixture is no longer good after about 45 minutes and must be thrown out so it is best to prepare ahead of time so that the mixture can be poured in a timely fashion. Using the syringe will be an immense help in keeping a steady hand and eliminating spills.
Using the syringe, suck up an amount of the Ice Resin mixture and slowly expel it into the first bezel. Going slowly will reduce the amount of bubbles.
Continue filling gently pulling the mixture to the corners of the bezel. Get down at eye level, watch and continue filling until the mixture is slightly higher than the level of the bezel. Add one drop at a time if necessary. Continue to fill each bezel as mixture amount allows.
In this case there was more mixture than bezels allowed for, so another bezel was added to use the entire mixture.
Use the needle and gently poke any bubbles that form. It is important to check a couple times for the first couple hours after pouring. Try not to knock anything! Spills are best cleaned using baby wipes if you have them on hand as the oil in the wipes will help break up the resin.
Cover all the bezels with the plastic cover to prevent dust from getting on the surface. Check every half an hour or so for bubbles for a couple of hours and then leave for it to harden for 24 hours. It takes a full 3 days for the fabric pendants to cure properly.
So here it the final result. Please feel free to ask me any questions or make any suggestions on better methods you might find along the way. Also, I would love to see what you create, so please stop by and show me what you've created using this tutorial. Thank you!


These are very cool!
ReplyDeleteSuper cool!
ReplyDeleteThis is so cool, Thank you!!!
ReplyDeleteWhat a fab idea! I can't wait to try making these sometime soon!!!
ReplyDeleteFantastic tutorial! Thanks so much. We just made a copper penny countertop with resin and another way to pop the bubbles is to "huff" on it with your breath, like huffing on a cold window to create condensation. It is the carbon dioxide in your breath which pops the bubbles.
ReplyDeleteI need to go find some more resin now and some cute fabric.
Thanks again
They also pop with heat. I use one of those stick lighters and lightly run it over the top and the bubbles disappear.
DeleteSO cool. Excellent tutorial. Thanks so much for sharing!
ReplyDeleteGreat tutorial...thanks for sharing!
ReplyDeleteGreat tutorial! Very detailed. Thanks for the links to suppliers, too.
ReplyDeleteGreat easy to follow tutorial.
ReplyDeleteYou make is look sooo easy!
Thankyou.
HI Jeannette,
ReplyDeleteLove this tutorial, definitely going to give it a go. Can I ask you where you got your supplies from. Do Spotlight have them????
HI Jeannette,
ReplyDeleteLove this tutorial, definitely going to give it a go. Can I ask you where you got your supplies from. Do Spotlight have them????
Wonderful tutorial!! I have some fabric scraps that my grandmother used to make me a quilt when I was a little girl and I have never been able to part with them. Now I can wear a part of her with me!! Thanks so much!!
ReplyDeleteBeautiful idea...so creative. Great tutorial skills. Thank you.
ReplyDeleteThis comment has been removed by the author.
ReplyDeleteExcellent idea and the pendants came out beautiful. Is there any way of cleaning the resin from the stringes after finishing or do you simply throw them away?
ReplyDeleteI have no experience with this at all so please forgive my ignorance. If the resin is only on one side does that mean the back of the pendant is material or do you put resin on both sides?
ReplyDeleteI have found that plastic sticks don’t produce as many air bubbles as wooden sticks. Hobby Lobby in USA has the Ice Resin in a kit with the cups and plastic sticks. You can also use 70% rubbing alcohol on a paper towel works wonders on cleaning up spills. I have also found that the ice resin will not stick to silicone. I found a silicone mat that I use under my raised pieces so if it does run over it can be pealed off of the silicone mat.
ReplyDeleteI love this. What a super tutorial! Thank you. I've done these before and used Mod Podge and Mod Podge Dimensional Magic, but I like the way yours turned out better. Got me a new project and what a fun one. Thanks so much for taking the time for us!
ReplyDeleteInstrucciones en esoañol porfavor.... Gracias
ReplyDelete